 |
Starboss (great dodecahedron) |
Materials needed
|
Starboss (great dodecahedron) |
Materials needed
Construction paper - preferably sulfide, 12”x18”
Pattern: Pattern: Make mountain folds on the blue lines. Make reverse or valley
folds on the red lines. Cut on the black lines. This pattern can be downloaded.

Scissors
Cardboard backing
Push pins
Sharp table edge
Paper clips
Stapler and Staples
The solid
Schläfli symbol: 5^(5/2)
Conway symbol: Plait, jI
Type of plait: triangular
Plaiting pattern: Pentyl (6 strips of 10 quadrilaterals each)
Complexity: 60 but allow 40 minutes because the dimples are hard to weave together.
Size Ratio: 3.077681
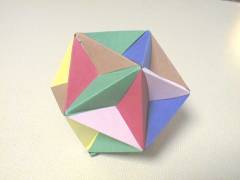
Starboss is one of the non-convex polyhedra, the great dodecahedron. Its face is the pentagon, but these pentagons meet at a star pattern at each vertex. These star patterns look like embossed stars (as if it were an insignia on a general's uniform) on a pentagon face. Although this weave is based on the fairly simple Pentyl pattern, the concavity of the star patterns causes special difficulties. However, the solid does look attractive.
Pattern
The model requires six pieces each 11 quadrilaterals long. The pieces require alternate folds. Divide the size that you want by the size ratio above to get the size to enter in the Weaving Paper Polyhedra software program to produce the patterns.
The best color scheme is to use six different colors. Five pieces are used to form an embossed star along with the star on the opposite side. Around the girth runs the sixth piece.
The pieces should be longer than is required to go around the solid by two or three quadrilaterals, to ensure that a quadrilateral is available to tuck in when the strands are completed. When a strip is completed, cut off the excess, but allow for a tab.
It is possible that a final tuck for a strand may not work because a piece must be inserted in a hole too small for it. For example, a pentagon piece must go through a square slot. In that case, cut off a corner of the piece to make the tuck work.
1. Cut out the pieces
Lay the backing on a table. The purpose of this backing is to absorb the pricks from the push pin. Lay the required number of sheets of construction paper on the backing, one on top of the other. Lay the pattern on top of the construction paper stack.
Prick each corner of the pattern with the pin hard enough to go through all the pieces of construction paper.
Using the pricks as a guide, cut the pieces out from the construction paper. First cut around the pricks so that you don’t have to deal with the entire sheet of construction paper. Cut from prick to prick. Using a straightedge to draw lines between pricks to determine where the cut should go will result in a more accurate cut but will also result in a pencil mark to erase.
Several sheets can be cut at the same time. Staple the sheets together, being generous with the staples. Be careful that the sheets don’t wander when you cut them - that could result in inaccurately cut pieces.
2. Fold the pieces
Lay the pattern on a table. Lay a piece next to it so that it is oriented the same as the table pattern. Fold on the inside according to the solid lines in the pattern. Use a sharp table edge or ruler edge to make a clean fold. The folds should cause the strip to curve upward.
Fold each strip the same way. The key to folding the strips is:
Black: outside of strip
Blue: Fold (mountain fold)
Red: Reverse Fold (valley fold)
Light gray: Information (for example, the boundaries of the quadilaterals)
Folding two or three at once will save time but may result in inaccurate folds. Fold alternate folds in opposite directions (see key above). Folding the strips so that they are oriented the same as the table pattern, so that you can stack the strips on top of each other, will ensure that the strips will fold together so that the tabs will tuck under, not over.
3. Assembling the model
This model is formed by weaving the strips together. A strip goes over another strip and then under the next one, continuing the under and over pattern around the model.
Two strips overlap at a quadrilateral, a polygon with four sides. Such a polygon has two pairs of opposing edges. One strip goes over one pair of opposing edges, and the other strip over the other pair.
Therefore, the quadrilaterals on each strip alternate between under and over. Laid out flat, the strip looks like this:
under, over, under, over, under, over, under
The tabs tuck under a quadrilateral from another strip, a little like closing the cover on a cardboard box. So when assembling the solid, make sure that the tabs go under. When introducing a new strip, count from the crossing point to the end. If the strip is inserted under another one, for example, count "under, over, under…" until you reach the end. If you get "over" when you reach the end, the strip is inserted incorrectly.
The weaving operation leaves a result consisting only of the strips of construction paper, but paper clips are needed to form the model. The paper clips are removed when the model is completed.
a. Weave five of the pieces together to form an embossed star. Hold together underneath with tape. Be sure when weaving that the dimples of the solid go inward. These dimples tend to go outward, especially about halfway to completion.
b. Weave in the sixth piece. This will cause the solid to close up to form a star on the other side.
This solid needs accurate folds and cutting. There is a tendency for a hole
to form at the vertices where the pentagons meet.
Back to Polyhedra Page
Back to Mathematics Page
Back to main page